10 Simple Steps to Start a Mini Orchard in Your Backyard
Growing your own fruit sounds like a big project. Many people think orchards need acres of land and years of experience. That is not true anymore. A mini orchard lets you grow multiple fruit trees in a small space. Even a modest backyard can produce fresh fruit every year.
A mini orchard uses dwarf or semi-dwarf trees. These trees stay small and are easy to manage. With good planning and simple care, you can enjoy apples, peaches, pears, or citrus right at home. This guide will walk you through the process step by step. No complex terms. No confusion. Just clear advice you can follow.
Step 1-What is A Mini Orchard
A mini orchard is a compact, intentionally planted collection of fruit trees, typically dwarf or semi-dwarf varieties, designed to produce abundant, high-quality fruit in a limited space. Unlike traditional large-scale orchards that feature full-sized trees spread across acres, a mini orchard emphasizes manageable scale, fitting into a small backyard, patio, or even containers.
By using dwarfing rootstocks and consistent pruning techniques, growers keep trees small (usually 8–12 feet tall or less), allowing them to plant more trees closer together while maintaining easy access for care, harvesting and pest management. The focus shifts from sheer tree size to flavorful, fresh harvests that suit home use, with the added bonus of beautiful spring blossoms and year-round garden interest.
A mini orchard thrives in modest areas—for example, a 10×10 or 15×15 foot plot can comfortably accommodate four to six trees, depending on spacing and variety. Larger yards offer flexibility to expand without overwhelming maintenance demands. Key benefits include steady, staggered fruit production (by selecting varieties that ripen at different times), improved pollination from nearby trees, reduced need for ladders or heavy equipment and lower overall effort compared to standard orchards.
Many gardeners incorporate diverse fruits like apples, pears, peaches, plums, cherries, or even citrus in suitable climates, turning unproductive lawns or borders into productive, eco-friendly spaces that support pollinators and provide fresh, homegrown food.
Step 2-Choose A Sunny Location

Fruit trees need lots of sun to grow strong and give good fruit. Pick a spot that gets at least 6 hours of direct sunlight each day. Eight hours or more is even better. Without enough sun, the trees stay weak, leaves turn pale, and you get very little fruit.
Look for an open area away from tall buildings, big trees, or high walls that block the light. Good air flow is important too. It keeps the leaves dry after rain and helps stop diseases like fungus. A breezy, sunny spot makes your mini orchard healthy and easy to care for.
If your yard has partial shade, try pears or plums first—they’re the best from your list for lower light. For even better shade options, consider other fruits like figs, sour cherries (Morello type), or pawpaws.
Step 3-See Your Growing Zone
Fruit trees grow best when they match your local climate. Each type has limits on how cold or warm it can handle. USDA hardiness zones show the average lowest winter temperature in your area. This helps you pick trees that survive winters and fruit well.
In countries like the US, Canada, UK, Australia, or parts of Europe, check the USDA Plant Hardiness Zone Map (or a similar local map) for your spot. Choose fruit trees suited to your zone. This simple step avoids weak trees or no fruit. Many varieties work across zones—look for low-chill types in warmer areas (like zones 8–10) and cold-hardy ones in cooler zones (like 4–7).
Here is a simple table with fruit types, typical USDA zones, and example popular varieties (including low-chill options where needed for warmer zones). These are common choices for mini orchards.
| Fruit Tree | Typical USDA Zones | Popular Varieties (Examples) |
|---|---|---|
| Apple | 4–9 | Honeycrisp, Gala, Fuji (zones 4–8); Anna, Dorsett Golden, Pink Lady (low-chill for zones 8–9) |
| Pear | 4–9 | Bartlett, Bosc, Anjou (zones 5–9); Flordahome, Southern Bartlett, Shinseiki (Asian, low-chill for zones 8–9) |
| Peach | 5–9 | Elberta, Redhaven (zones 5–8); Eva’s Pride, August Pride, Tropic Beauty (low-chill for zones 8–9) |
| Plum | 4–9 | Stanley (European, zones 4–8); Santa Rosa, Methley (Japanese, low-chill for zones 8–9) |
| Citrus | 8–11 | Meyer Lemon, Satsuma Mandarin, Washington Navel Orange, Ruby Red Grapefruit (zones 8b–11, protect in colder parts of zone 8) |
Apples, pears, peaches and plums often need some winter chill to fruit well—pick low-chill varieties in warmer zones. Citrus needs little or no chill and hates hard freezes. Match the tree and variety to your zone for healthy growth and good harvests in your mini orchard!
Step 4- Choose The Right Fruit Trees
Choose the Right Fruit Trees Now that you have a sunny spot and know your growing zone, pick fruit trees that fit your space, climate, and tastes. For a mini orchard, go for dwarf or semi-dwarf varieties. These stay small (usually 8–15 feet tall), produce full-size fruit, and are easy to prune and harvest without ladders. They work great in small yards, patios, or even large pots.
Focus on what you love to eat, how much space you have, and if the trees need a partner for pollination. Many are self-pollinating (one tree is enough), but some need a second variety nearby for better fruit. Choose disease-resistant types to cut down on care.
Buy from a good nursery—they can help match varieties to your zone and area. This step sets up your mini orchard for steady, tasty harvests with low hassle.
| Fruit Tree | Mature Height (Dwarf/Semi-Dwarf) | Pollination Needs |
|---|---|---|
| Apple | 8–15 feet | Needs cross-pollination (plant 2 compatible varieties) |
| Pear | 8–15 feet | Often needs cross-pollination (some Asian pears are self-fertile) |
| Peach | 8–12 feet | Most are self-pollinating (one tree is enough) |
| Plum | 8–12 feet | Varies: Japanese types often self-pollinating; European types usually need a partner |
| Citrus | 6–12 feet (excellent in pots) | Most are self-pollinating (one tree is enough) |
Check: Orchard Ideas
Step 5-Chill Hours and Pollination
Chill hours tell you how much cold a fruit tree needs in winter to rest and make good fruit later. Chill hours count the time between 32°F and 45°F (0°C to 7°C). This is cool weather, not freezing frost. The tree needs this cold break to wake up properly in spring, drop leaves on time, grow buds, and set fruit.
If winter stays too warm, the tree gets confused. It may not bloom well or give little to no fruit. Picking the wrong variety for your climate is a common reason trees fail. For example, a high-chill apple like Honeycrisp needs long, cold winters. In a warm spot like southern California, it often does not fruit. A low-chill peach does much better there. Always match the tree’s chill needs to your area.
Here is a simple table for common fruits in a mini orchard. It shows chill hour ranges and examples of low-chill and high-chill types:
| Fruit Tree | Chill Hours Needed | Low-Chill Examples (500 or less) | High-Chill Examples (more than 500) |
|---|---|---|---|
| Apple | 200–1,000+ | Anna, Dorsett Golden, Ein Shemer | Gala, Honeycrisp, Granny Smith |
| Pear | 400–800+ | Flordahome, Shinseiki (Asian) | Bartlett, Bosc, Anjou |
| Peach | 100–1,000 | Eva’s Pride, Flordaprince, Tropic Beauty | Elberta, Redhaven, Contender |
| Plum | 300–900 | Methley, Santa Rosa (Japanese) | Stanley (European), many others |
| Citrus | 0–200 (very low or none) | Meyer Lemon, Satsuma Mandarin, Navel Orange | Most citrus need little or no chill |
Pollination Tip
Some fruit trees are self-pollinating (one tree is enough). Others need a second different variety nearby for bees to move pollen. Apples and many pears usually need a partner. Most peaches, plums (Japanese types) and citrus are self-pollinating. Plant compatible types close together if needed. This helps your mini orchard give more fruit.
Step 6-Plan Your Orchard Layout and Spacing
Fruit trees can live and produce for decades, so get the spacing right from the start. Moving a young tree is possible but stressful for it, and transplanting a mature one is usually not worth the effort. Measure your mini orchard area carefully and plan where each tree will go based on its final size.
Most people space dwarf or semi-dwarf fruit trees 5 to 8 feet apart. This gives room to grow without crowding, while still fitting 4 to 6 trees in a small 10×10 or 15×15 foot space. The bare minimum is about 4 feet between trees, but only if you prune them often and keep them very compact. Wider spacing (5–6 feet or more) means less work over time, better airflow to prevent disease and easier picking.
Consider height and slope. Keep the tallest trees (like certain apples or fast-growing types) at the back or top of any slope so they don’t shade shorter ones. Place shorter or lower-growing trees toward the front or bottom of a south-facing slope to soak up the most light.
Pay attention to each tree’s natural shape and habits too. Apples and pears work well trained as espalier (flat against a fence or wall) to save space. Stone fruits like peaches, nectarines, or cherries often form a vase shape with wider canopies, so give them a bit more room.
Figs can spread as bushes or single-trunk trees, and their roots like to roam—keep them away from house foundations, paths, or pipes. For even smaller spaces, add compact options like container blueberries or fruit vines near a patio or house wall.
Blueberries (especially lowbush types) stay small, handle slight shade better than most fruits, and do fine with one plant every 2–3 feet in the ground or one per large (20+ gallon) pot. Always aim for as much sun as possible—too much shade cuts down on flowers and fruit. With smart spacing and thoughtful placement, your mini orchard will stay healthy, easy to reach, and full of fruit for years.
Step 7-Soil Preparation and Compost

Fruit trees in a mini orchard need healthy soil to grow strong roots. The best soil is well-drained and loamy (a mix of sand, silt, and clay). It holds some water but lets extra drain away fast. Poor drainage causes root rot, especially for peaches, plums and citrus. Apples and pears handle slightly heavier soil better. Test your soil first—get a simple kit or send a sample to a lab. This shows pH and nutrients so you know what to fix.
Most fruit trees like slightly acidic to neutral soil, around pH 6.0 to 7.0 (or up to 6.8 for best results). Apples, pears, peaches and plums do well at 6.0–6.5 or a bit higher. Citrus can handle up to 7.5–8.0. If your soil is too acidic (below 6.0), add lime to raise pH. If too alkaline, add sulfur to lower it.
Compost is the best friend for your mini orchard. Add plenty of well-rotted compost or organic matter to improve soil structure, hold moisture, feed helpful microbes and boost nutrients slowly. Mix it into the top 12–18 inches of soil before planting, or spread 2–4 inches on top as mulch after.
Do not stuff lots of compost or amendments right into the planting hole—use mostly native soil so roots spread out naturally. A thick mulch layer (3–4 inches of wood chips, straw, or leaves) over the compost keeps weeds down, holds water and feeds the soil as it breaks down. This simple prep gives your dwarf trees the best start for healthy growth and big harvests!
Step 8-Fruits Planting

With good preparations done, the actual planting is simple and quick. The best time is mid-spring, after the last frost risk passes. This gives roots time to settle before summer heat. In fall planting (in milder climates), trees focus on root growth without fighting hot weather or new leaves. Avoid planting in summer heat or deep winter freezes.
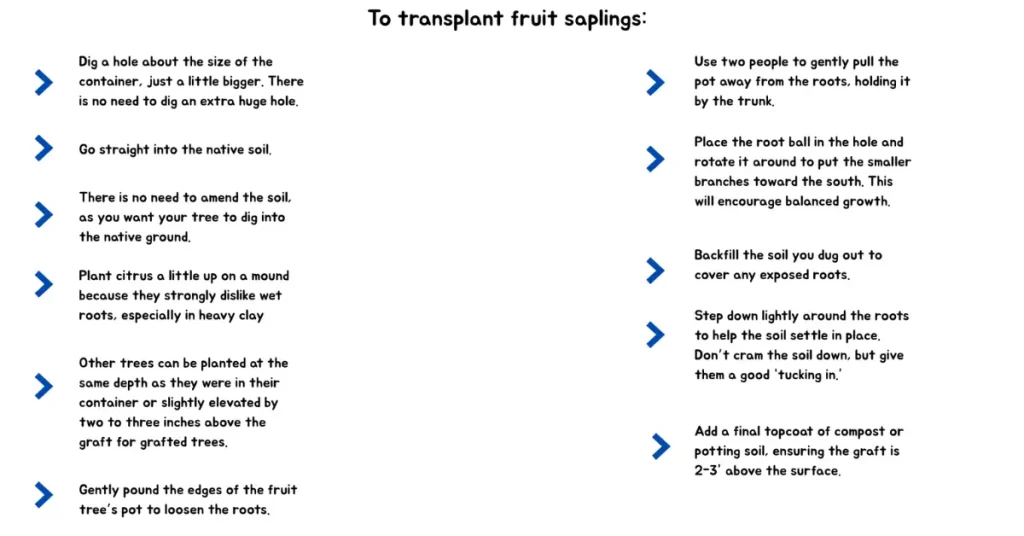
The biggest mistake is planting too deep. Look for the graft union—a bumpy spot or color change where the rootstock meets the scion (the fruiting part). Keep this union 2–3 inches above the soil line, never buried. If covered by soil or mulch, the tree may rot or grow poorly from the scion instead of the strong rootstock. If you plant too deep by accident, fix it right away: gently lift the tree with a shovel or pitchfork, add more soil underneath, and reset it higher.
When planting, handle roots carefully. For potted trees, most loosen naturally when you tip them out—tease apart any tight circles gently with your fingers. Do not dig hard into the root ball, especially for sensitive types like avocados or some citrus. Avocados often do best planted on a small mound (raised slightly above ground level) so the roots stay near the surface and avoid rot in heavy soil.
Dig a hole twice as wide as the root ball but only as deep as the pot. Place the tree in, backfill with the same soil (mixed with a little compost if needed), and firm it gently—no stomping. Water deeply right after to settle the soil and remove air pockets.
After planting, add 2–4 inches of mulch (wood chips, straw, or bark) around the base in a wide circle, keeping it 2–3 inches away from the trunk to prevent rot. Optionally, sprinkle a light amount of balanced, slow-release fertilizer on the soil surface before mulching.
Skip heavy fertilizer at planting; let trees establish first on their own. Feed more in later years once they flower and fruit. Water regularly the first season (deeply but not too often) to help roots spread.
Step 9-Pruning
Pruning right after planting can feel scary, but it is one of the most important steps in a mini orchard. Young fruit trees often grow tall and thin if left alone. This makes them hard to manage later. Early pruning helps the tree grow strong and bushy instead of tall and weak.
The goal is to encourage branches to form low on the trunk. Lower branches mean a lower canopy. This makes harvesting easy and keeps the tree within the 6–8 foot height that works best for mini orchards. A compact shape also improves airflow and sunlight inside the tree.
Use sharp, clean pruning shears. Cut back about one-third to half of a tall, leggy sapling. Look for healthy buds on the trunk and make your cut just above a bud at a slight angle. Make one clean cut so the tree can heal quickly. It may look harsh, but this helps the tree put energy into strong roots and side branches.
If you plan to grow your trees as espalier (flat against a fence or wall), planting time is the best moment to start. Install a sturdy trellis before planting. Then prune and gently train the main branches along the support. This saves space and keeps your mini orchard neat, productive, and easy to care for.
Step 10-Be Patient and Maintain Your Orchard
Fruit trees take time. Some produce fruit in one year. Others need two or three. This is normal.
Each year gets easier. Trees become stronger. Harvests become larger. With simple seasonal care, your mini orchard will reward you for decades.
Common Mini Orchard Mistakes to Avoid
Starting a mini orchard is exciting, but small mistakes can lead to weak trees or poor harvests. Knowing what not to do is just as important as knowing what to do. Avoiding these common errors will save you time, money, and frustration in the long run.
Planting trees too close without pruning is one of the biggest mistakes. While mini orchards allow close spacing, trees still need room to breathe. If you plant them close and skip regular pruning, they compete for light, water, and nutrients. This leads to tangled branches, more disease, and less fruit. If you want tight spacing, be ready to prune every year. For lower maintenance, give each tree a little more space from the start.
Choosing the wrong trees for your climate causes many orchards to fail. High-chill varieties planted in warm areas may bloom poorly or not fruit at all. Cold-sensitive trees planted in frosty zones can die back every winter. Always match fruit type and variety to your growing zone and chill hours. This single choice often decides success or failure.